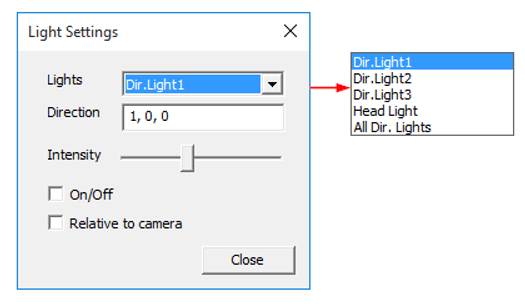
Light Settings
VCollab Pro lets users alter light settings for better visualization, especially inside the parts.
There are two types of lights whose settings can be altered for better viewing:
Head Light
This light is attached to the camera. Light direction is updated automatically whenever camera direction changes.
Users can turn on/off this light, but cannot edit the light direction.
Direction Lights
There are three direction lights with three mutually perpendicular directions which are switched off by default.
Users can turn on/off these lights and can edit each light direction.
Users can attach these lights to the camera or remove them from the camera.
Users can vary the light intensity from least bright to most bright.
Light Settings Panel
The various controls and fields available in the light settings panel are explained below.
Lights |
Select a light for editing |
Direction |
Edit the direction of selected light. Not applicable for Head Light and All Dir. Lights. |
Intensity |
Changes light brightness |
On/Off |
Turns On/Off the selected light. |
Relative to Camera |
Attaches the selected light to camera. Applicable for individual direction lights. |
Steps to enable lights in VCollab Pro
Load a CAX file with multiple parts.
Headlight will be turned on by default.
Find a dark area, between parts or inside a part.
Focus the view to the dark spot using the pan,zoom and rotate options.
Click Edit | Light Settings..
Select a directional light.
Turn on the light by checking the On/Off checkbox.
Change the direction of light if the dark spot is not lit up well.
Increase the intensity for better brightness.
Click Relative to camera to attach the light to the camera.
Note: ‘Relative to Camera’ and ‘Direction’ options are not applicable for All Dir. Lights and Headlight.
