Visualization-of-MSC Adams-data-in-VCollabPro X
The following steps help managing the better and faster Visualization of MSC.Adams Simulation using VCollab solution.
Convert
Visualize and Post-process
Publish
Co-Simulation
Convert: This process involves the conversion of Adams data into CAX. The application VMoveAdams is used for the conversion.
Visualize and Post-process: The process helps to visualize and post-process the converted CAX file. The application VCollabPro is used for it.
Publish: The process involves exporting the CAX into 3D HTML. The application VCollabPro is used to export it. The exported 3DHTML with Adams simulation can be visualized in any web browser.
Co-Simulation: This process helps playing the co-simulation of MSC.Adams and MSC.Marc data
1.Convert using VMoveAdams
The utility VMoveAdams helps generate CAX files from MSC. ADAMS input and result files. This is a batch utility and the usage is as below.
VMoveAdams.bat <Adams_adm_file> <Adams_res_file> [--output=cax_file]
Note
This application needs Adams Solver license as well as VCollab license in order to create the CAX file.
The VMoveAdams.bat file is located in the installation directory
The CAX from VMoveAdams includes
Rigid Body Parts with motion
FLEX Body Parts with motion and following results
Displacement
Stress
Strain
The CAX from VMoveAdams can be visualized and post-processed from VCollab Pro X 21 on-wards.
2.Visualize and Post-process using VCollab Pro X
The product structure of Adams CAX file is shown as below, once the CAX file is loaded in VCollabPro
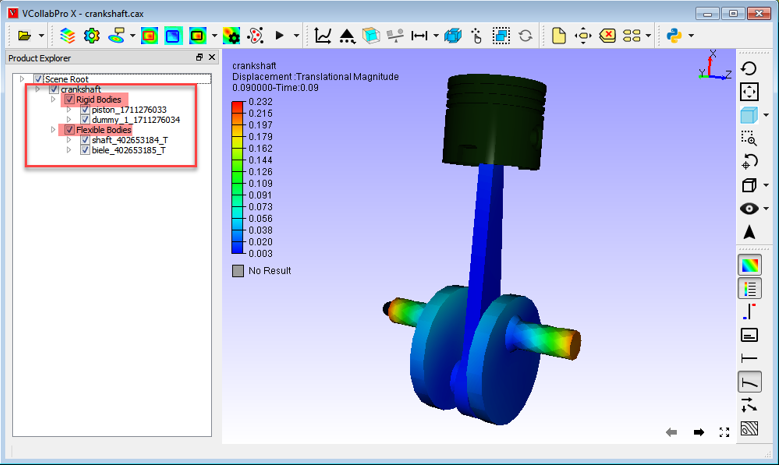
The Rigid Body Parts are grouped under 'Rigid Bodies' and Flexible Body parts are grouped under 'Flexible Bodies' for easier scene tree manipulation in the 'Product Explorer'. It helps show/hide the rigid and flexible parts easily.
Results List of Flexible Body Parts
The results for Flexible Body parts are listed in the ' Results' dialog.
How to get Results list: Click ' CAE | Result List…’ option in the viewer context menu. Click Here for more details
The standard list of results of Adams model are
Displacement
Stress
Strain
Note
These results will be available in the CAX file if the MNF file has the results
Visualization of Rigid and Flexible Parts Simulation
The Rigid and Flexible parts simulation can be played using the CAE Animation option in VCollabPro.
How to Play:
Click ' CAE | Animate' option in the viewer context menu
Animation Settings
This option helps user to change the different animation settings. Click Here for more details.
By default, the 'CAE | Animate' option plays the motion of the rigid and flexible parts simultaneously for Adams model. The motion of Rigid and Flexible parts can be played separately using the following option.
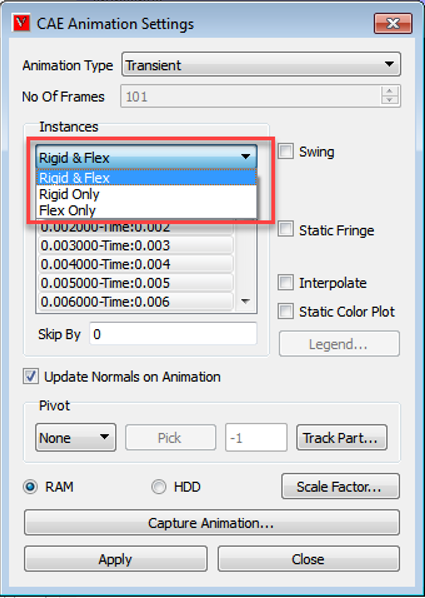
1.Click 'CAE | Animation Settings' option in the viewer context menu. It launches the 'CAE Animation Settings' dialog.
2.The 'Rigid & Flex' option is selected by default. The 'Rigid Only' or 'Flex Only' option can be selected to play the respective motion.
Different options to play around with large model with more number of time steps If the Adams motion includes a large number of Time steps, it might take more time to view one cycle of an animation. The cycle time of animation can be reduced by using any one of the following options in the 'CAE | Animation Settings...' dialog.
Select the specific time steps
Using 'Skip By' option
Interpolate
Select RAM/HDD option
Select the specific time steps
The Animation Settings dialog enables the option to the user to select the specific time steps. All the time steps are listed in the 'Instances' field. By default, all time steps are selected. The user can select the required time steps that are listed in the 'Instances' field as shown below.
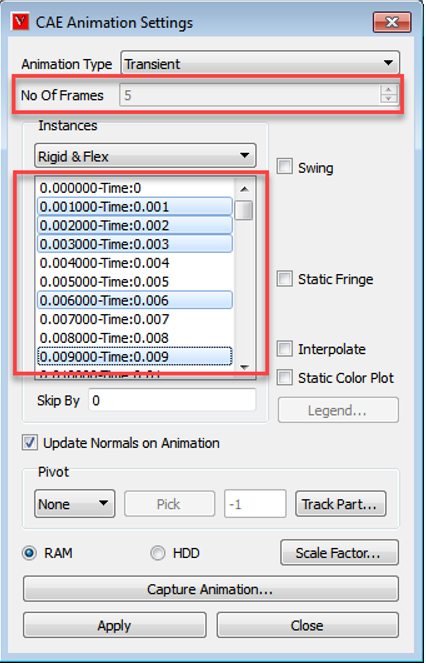
Procedure:
Select the Time Steps (Multi-selection is enabled here)
Click the Apply button
Click the 'Animate' button to view the animation with the selected time-steps. Now the animation includes only the selected time steps
Using Skip By option
Here, the user can reduce the animation cycle time by skipping a specific set of frames. This can be achieved by skipping odd number of frames or two or more frames. Click Here (What is the advantage of ‘Skip By’ option?) for more details.
Procedure:
Enter a number in the 'Skip by' field.
Click the Apply button.
Click the 'Animate' button to view the animation with the selected time-steps.
Interpolate
This option enables user to interpolate time steps to play the smooth simulation if required. Click Here (How to use ‘Interpolate’ option in Transient Animation?) for more details.
Select RAM/HDD option
The selection of animation data source (RAM or HDD) based on the CAX data size. It helps improving the animation speed. The User has two options to store animation frame data either into RAM or HDD.
RAM - this option provides an improved performance during animation. This performance will reduce and hang if RAM free space is less or nearly null.
HDD - this option stores frame data into hard disk and revoke it whenever necessary. If memory is nearly full in RAM, user can use this option for a better improved cycle.
3.Publish using VCollabPro
VCollab allows the users to export the MSC.Adams simulation into 3DHTML. Once the model is exported into 3D HTML, it can be visualized using any web-browser on any system like, Laptop, Desktop and mobile phones. It doesn't need any software to be installed to view the 3DHTML.
How to export: Click 'File | Export | wCAX/HTML...' Click Here for more details.
Different options to export large Adams model into 3DHTML
If the Adams model is large or has the lot of time steps, then exporting everything into the 3DHTML is not recommended. The user can try any one of the following options to reduce the 3DHTML file size to get the better visualization performance in any browser.
Select the specific time steps
Using 'Skip By' option
Using 'Export Selected Elements' option in 'File | Export | wCAX/HTML...' dialog. (Selected Elements) for more details.
Using 'Compact' option in 'File | Export | wCAX/HTML...' dialog. Click Here
4. Co-Simulation using VCollabPro
VCollabPro allows user to play the simulation of models from 2 different physics simulation types (example, MSC.Adams and MSC.Marc). The steps to play the co-simulation is below.
Load the first model (Click Here for more details)
Merge the second model (Click Here for more details)
Play the animation (CAE | Animate). It will play the co-simulation here.
If the time steps are different in each model, enable the 'Interpolate' option in 'CAE | Animation Settings' to sync the different time steps while playing the co-simulation. Click Here (How to use ‘Interpolate’ option in Transient Animation?) for more details on 'Interpolate' option.