VCollab Installation
VCollab Suite (64-bit) is an installer package from Visual Collaboration Technologies Inc. which includes the following products.
VCollab Pro X
VCollab Presenter X
VMoveCAE
VCollab Pro
VCollab Presenter (ActiveX Based Viewer)
VMoveCAD
VMoveAdams
VMoveCST
VMoveVTK
VMoveJT
Note
The following products are selected for the installation by default.
VCollab Pro X, VCollab Presenter X, VMoveCAE and VCollab Pro
The following products will be installed only if they are selected by user
VCollab Presenter(ActiveX Viewer), VMoveCAD, VMoveAdams, VMoveCST, VMoveVTK and VMoveJT
The Default Installation location is “C:\Program Files\VCollab\xx.x”
The shortcuts for VCollab products are listed under “VCollab” in Start Menu
Supported Licensing schemes
VCollab supports the following license schemes.
Floating License
Node Lock License
Floating License
A license that can authorize usage of an application by one of a group of users on a network. A license server is required to manage a floating license. Floating licenses must be counted.
Node Lock License
A license that can authorize use of an application running on a single specific machine, as opposed to on a network. Node-locked licenses are usually uncounted. Node-locked, uncounted licenses do not require a license server.
System Requirement
Hardware Requirement:
Desktops
Win 64 BIT
8 GB RAM with 16 GB virtual memory
A graphic accelerator card with minimum of 256 MB RAM
Graphic drivers that support OpenGL 1.2 and above
Laptops
Win 64 BIT
5 GB RAM with 12 GB Virtual Memory
A graphic accelerator card with minimum of 256 MB RAM
Graphic drivers that support OpenGL 1.2 and above
Software Requirements
Operating System
Windows 7 and Windows 10
Installation of VCollab Suite
Run Setup.exe that comes as part of VCollab Suite distribution. Following Window will appear
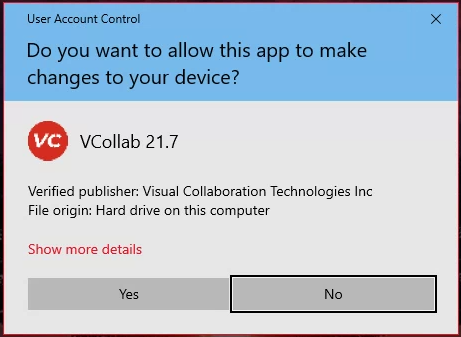
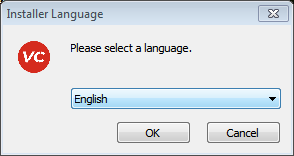
Click Yes to continue. The Language selection window wiill appear user can choose one of any language from the list. English will be the default language
Then Following window will appear.

After the Setup prepares installer wizard, VCollab Suite Setup Window appears with Welcome Message.
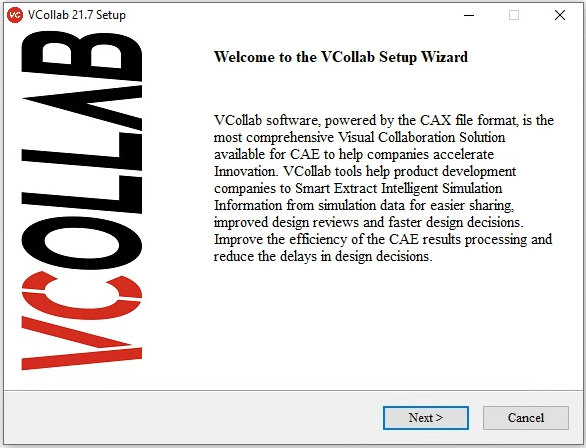
Press “Next” button. A following window showing license agreement appears
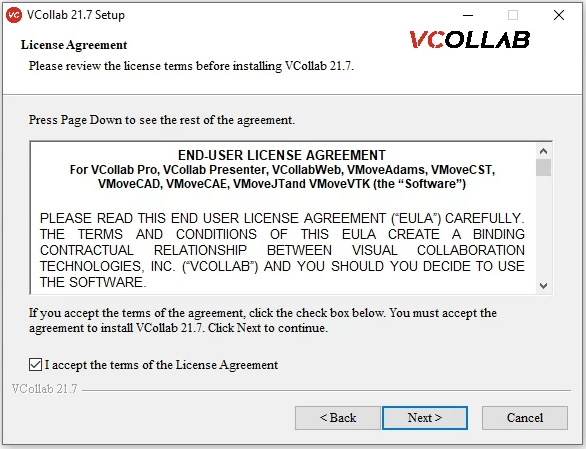
If you agree all the terms and conditions, press “Next” button
The ‘Choose Components’ wizard appears to select the products to be installed.
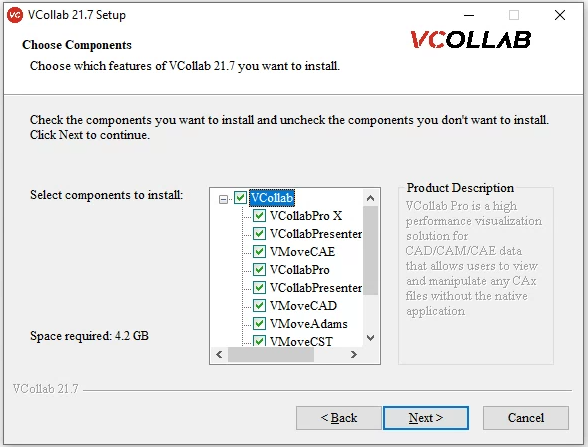
The following products are selected for the installation by default
VCollabProX
VCollabPresenterX
VMoveCAE
VCollabPro
The following products will be installed only if they are selected by user
VCollabPresenter
VMoveCAD
VMoveAdams
VMoveCST
VMoveVTK
VMoveJT
Press ‘Next’ Button to continue the installation. The ‘Choose Install Location’ wizard appears to select where the user wants to install it. The default location is “C:\Program Files\VCollab\xx.x” as shown in the following figure
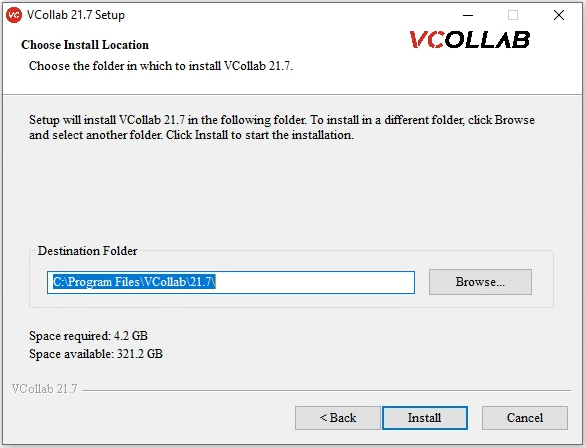
User can change the install location by clicking the ‘Browse’ button.
Click ‘Install’ button to complete installation. The following window shows up to confirm that installation is complete.
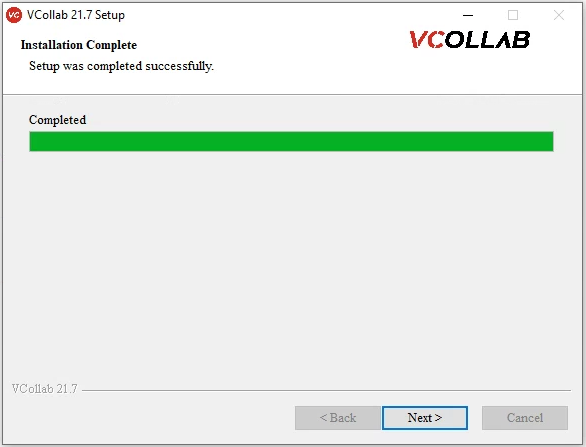
Click on Next to popup next window to configure the license by using the following page. Select the option (Floating/Node lock) based on the license that you have.
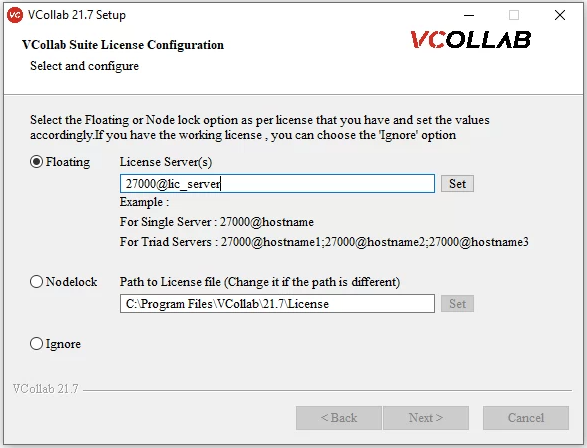
After setting the required license option, Click on Next to popup the finish page.
The following window shows up to confirm that installation is complete.
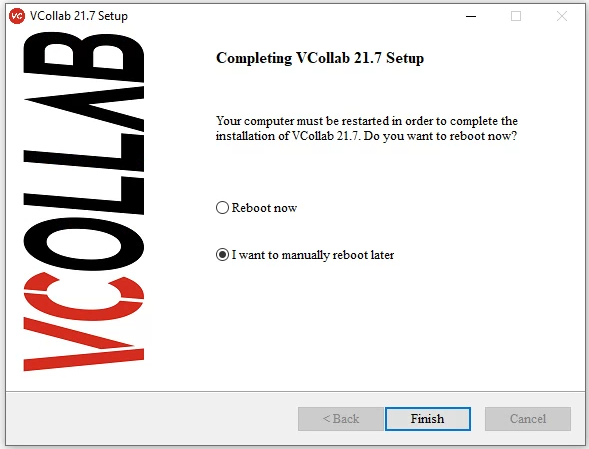
Note
It’s not mandatory to restart the system after installation. If there is an issue in running any one of the VCollab’s product, it’s recommended to restart the system.
Uninstallation of VCollab Suite
Uninstallation of VCollab Suite can be done in two ways
Uninstall from shortcut menu
Uninstall from Add and Remove Programs of Control Panel
Uninstall from shortcut menu
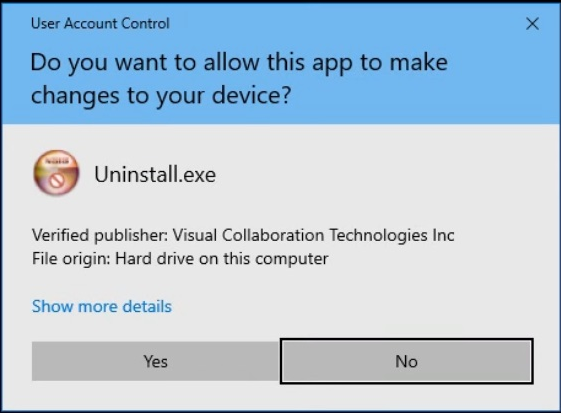
To uninstall VCollab Suite, click uninstall shortcut from ‘Start | All Programs |VCollab | Uninstall VCollab_xx.x’ menu, the following windows appear.
Click ‘Yes’ to uninstall and ‘No’ to stop the uninstallation.
Uninstall from ‘Add and remove programs’ of Control Panel
To uninstall VCollab Suite, Click Windows ‘Start | Control Panel | Add and Remove Programs’ and Select VCollab_xx.x’ and click unintsall.
VCollab Silent Installation (Batch Installation)
VCollab Installer provides option for installing software in silent mode on the command line.
Syntax:
setup.exe /s [Installation_Options]
The following options can be used during the installation.
Installation Options
/s |
Silent |
Instructs the installer to install in the silent mode |
INSTALL |
Installation of selected products |
Allows to mention the specific products to be installed |
/LOG |
Log File Path |
Allows to mention the log file path for the installation |
/D |
Installation Directory |
Allows to change the installation directory. Note:
|
Note
The batch Installation process needs administrator privileges
The options are not case-sensitive
The default installation path is ../Program Files/VCollab/xx.x (Here, xx.x refers the product version)
VCollab Suite installer includes the following products.
VCollab Pro X
VCollab Presenter X
VMoveCAE
VCollab Pro
VCollab Presenter (ActiveX Based Viewer)
VMoveCAD
VMoveAdams
VMoveCST
VMoveVTK
VMoveJT
By default, the installer installs the following.
VCollab Pro X
VCollab Presenter X
VMoveCAE
VCollab Pro
The following products will be installed only if they are selected by the user
VCollab Presenter(ActiveX Viewer)
VMoveCAD
VMoveAdams
VMoveCST
VMoveVTK
VMoveJT
Product Identifiers
The following is the list of identifiers that are used to refer the corresponding product in the INSTALL command line option.
Product Identifier |
Product Name |
|---|---|
VCOLLABPROX |
VCollab Pro X |
VCOLLABPRESENTERX |
VCollab Presenter X |
VMOVECAE |
VMoveCAE |
VCOLLAB_PRO |
VCollab Pro |
VCOLLAB_PRESENTER |
VCollab Presenter (ActiveX Based Viewer) |
VMOVECAD |
VMoveCAD |
VMOVEADAMS |
VMoveAdams |
VMOVECST |
VMoveCST |
VMOVEVTK |
VMoveVTK |
VMOVEJT |
VMoveJT |
DEFAULT |
VCollab Pro X, VCollab Presenter X, VMoveCAE and VCollab Pro |
VCOLLAB_ALL |
All Products |
Examples
Example:1
Setup.exe  /s

This option installs the default products (VCollab Pro X, VCollab Presenter X, VMoveCAE and VCollab Pro) in the silent mode
Example:2
Setup.exe /s  INSTALL=DEFAULT

This option installs the default products (VCollab Pro X, VCollab Presenter X, VMoveCAE and VCollab Pro)
Example:3
Setup.exe /s  INSTALL=VCOLLAB_ALL

This option installs all the VCollab products in the slient mode that are listed above
Example:4
Setup.exe /s  INSTALL=VCOLLABPROX,VMOVECAE

This option installs only VCollabProX and VMoveCAE in the silent mode
Example:5
Setup.exe /s  INSTALL=DEFAULT,VMOVECAD

This option installs the default products (VCollab Pro X, VCollab Presenter X, VMoveCAE and VCollab Pro) and VMoveCAD
Example:6
Setup.exe /s  /D=E:\\SW Folder\\VCollab

This option installs the default products (VCollab Pro X, VCollab Presenter X, VMoveCAE and VCollab Pro) in ‘E:\\SW Folder\\VCollab’ folder

.. note::

   - /D parameter must be the last command line option
   - It should not contain quotes in the path
Example:7
Setup.exe /s  INSTALL=VMOVECAE,VMOVECAD /D=E:\\SW Folder\\VCollab

This option installs the VMoveCAE and VMoveCAD in ‘E:\\SW Folder\\VCollab’ folder
Example:8
Setup.exe /s  INSTALL=VCOLLAB_ALL /LOG="D:\log\vcollab_install.log" /D=E:\\SW Folder\\VCollab

This option installs all the products in ‘E:\\SW Folder\\VCollab’ folder and writes the log file in D:\log\vcollab_install.log
VCollab Batch Uninstallation
The syntax for uninstallation in batch mode is as below
Syntax:
Uninstall.exe /s
Note
The Uninstall.exe is present in the installation directory
Deployment of Custom Python Scripts
The Custom Python Scripts can be deployed on a centralized Server and shared with all VCollab users. The environment variable VCOLLAB_PLUGIN_PATH is used to point to the Custom Python Scripts. The path to the custom scripts from a mapped_drive folder or a remote folder should be set to this variable.
Variable    :   VCOLLAB_PLUGIN_PATH

Value       :   Path_to_custom_scripts
Note
The Custom Python Script consists of a CSV file and a folder of Python Script files.
The VCOLLAB_PLUGIN_PATH should point to the path of the CSV file
The path can be a local folder or a remote folder or a mapped_drive folder
Multiple paths separated by semicolon can be added to this variable
Example 1 (Mapped Drive )
Variable : VCOLLAB_PLUGIN_PATH
Value : Z:\vcollab_custom_Scripts;Y:\vcollab_report_script
Example 2 (Remote folder)
Variable : VCOLLAB_PLUGIN_PATH
Value : \\remote_server\vcollab_scripts
Here, ‘remote_server’ refers the remote machine
License Configuration
The environement VE3D_LICENSE_FILE should be created/updated to mention the VCollab license.
For Nodelock license, the license file path should be appended to the value field of VE3D_LICENSE_FILE variable.
For example,
Variable
VE3D_LICENSE_FILE
Value
C:\VCollab\License
For Floating license, the license server address should be appended to the value field of VE3D_LICENSE_FILE variable.
For example,
Variable
VE3D_LICENSE_FILE
Value
27000@hostname (For Single Server)
Value
27000@hostname1;27000@hostname2;27000@hostname3; (For Triad Servers)
Note
The port number should be same as what is mentioned in the license file while starting the license server